

Putting one product on sale in Shopify takes thirty seconds. Open the product, move the current price into Compare-at price, type the new price, save. Done.
Putting 400 products on sale the same way takes a weekend. Taking them off sale again takes another one, usually late on a Sunday, usually with at least one product you forget.
That second half is the part most "bulk discount" guides skip. Changing many prices is half the job; changing them back, on time, without touching products that were never in the sale, is the other half. This guide covers both. It compares the three ways to bulk-discount a Shopify catalog (the built-in bulk editor, CSV import, and campaign-based sale pricing), shows step by step how to do it in Disco, and ends with the QA checklist to run before you change a few hundred prices at once.
Shopify bulk discounts vs. quantity discounts: what's the difference?
"Bulk discount" can mean three different things in Shopify. Choose the one that matches your offer.
| What people mean | What actually changes | Where the customer sees it | Native Shopify tool |
|---|---|---|---|
| A catalog sale price on many products | Each product's Price goes down and Compare-at price holds the original |
Product page and collection page (strikethrough), cart, checkout | Product editor, bulk editor, CSV |
| A discount applied at checkout to many products | Nothing on the product; the reduction is calculated in cart/checkout | Mostly at checkout | Automatic discounts and discount codes |
| A quantity discount ("buy 3, save 10%") | Price depends on how many the customer buys | Cart and checkout | Buy X Get Y, or a dedicated volume-pricing app |
We'll focus on catalog sale prices: changing many products so shoppers can see the offer while browsing. For help choosing between sale prices and checkout discounts, see How to show sale prices on Shopify product pages before checkout.
Shopify's bulk editor and CSV import both handle mass price changes. Your choice depends on the size of the job, how often you run sales, and who will restore the prices afterward.
Method 1: change sale prices with Shopify's bulk editor
The bulk editor is the tool most merchants reach for first, and for small sales it's the right call.
To use it:
- In Products, filter and select the products for your sale.
- Click Bulk edit to open the table of products and variants.
- Open Columns and add Compare-at price beside Price.
- Enter the original and sale prices for each variant, then save.
Where it's good:
- It's free and built in, so there's nothing to install and nothing new to learn.
- Changes are live the moment you save.
- A small collection is easy to review in one table.
Where it starts to hurt:
- Large selections take more checking. If you work in batches, keep track of which products you've updated and include all their variants.
- Prepare the new prices first. For a percentage sale, calculate the values in a spreadsheet before pasting them into the editor.
- Rollback is entirely manual. When the sale ends, someone has to put every
Priceback and clear everyCompare-at price, by hand, from a record of the original prices that you had to remember to keep. - There's no clock. The sale starts when you click save and ends when you click save again.
Use the bulk editor when: you have fewer than about 50 products, the sale is a one-off, the end time doesn't need to be exact, and you're happy to do the rollback yourself.
Method 2: bulk change Shopify prices with a CSV file
CSV works well when you already manage product data in spreadsheets. It gives you room to calculate and review many prices, but the import needs careful checking.
The workflow is:
- Export the products and keep an untouched backup.
- In a working copy, copy the current prices into the compare-at column.
- Calculate the sale prices and check the results.
- Test a small import before updating the full selection.
- At the end of the sale, restore prices from the backup, accounting for any other changes made since the export.
Where CSV makes sense:
- Permanent repricing, where there is no "end" to roll back to.
- Catalog restructures where you're changing many fields at once, not just price.
- Teams that already manage the catalog in spreadsheets and have a clear owner for the file.
The risks you need to manage:
- Check every included column. An import can overwrite more than prices. Accidental blanks or misplaced formulas can affect other product data.
- Matching is unforgiving. A changed handle or a variant that doesn't line up creates duplicates or silently skips products.
- Formatting breaks prices. Decimal commas versus decimal points, currency symbols, or a spreadsheet "helpfully" reformatting a column can turn 249.00 into something Shopify rejects, or worse, accepts.
- Allow time for processing. Someone must start both imports, and a large import may continue running after your intended launch time.
- Rollback is a second import. If you restore by re-importing the original file, any price you legitimately changed during the sale gets reverted too.
If you use CSV, keep the untouched export as your rollback file, and always test the import on a filtered export of ten products before you run it on the full catalog.
Use CSV when: the change is permanent or structural, you have a data owner, and precise start and end timing doesn't matter.
Method 3: schedule bulk discounts with an app
For a temporary sale, a campaign keeps the product selection, discount, dates, and reset in one setup.
A campaign-based tool like Disco combines five things the other two methods leave to you:
- A selection rule. Pick products by collection, tag, product type, or vendor instead of ticking boxes.
- A discount rule. A percentage or a fixed amount off, applied to whatever the selection returns.
- Exclusions. Products or groups that must never be touched, even if they match the selection.
- A time window. A start date and time, an end date and time, and automatic reset of the original prices afterward.
- Storefront elements. Sale badges, an announcement bar, a countdown timer, and a sale collection, so the price change and the marketing of it go live together.
Disco updates the same Price and Compare-at price fields as the bulk editor or a CSV. Your theme still controls the price display. The campaign handles the selection, calculations, exclusions, schedule, and reset.
Check that your theme shows compare-at prices where you want them. Also check any integrations that update prices: a later sync can overwrite the campaign's changes. The checklist below covers both.
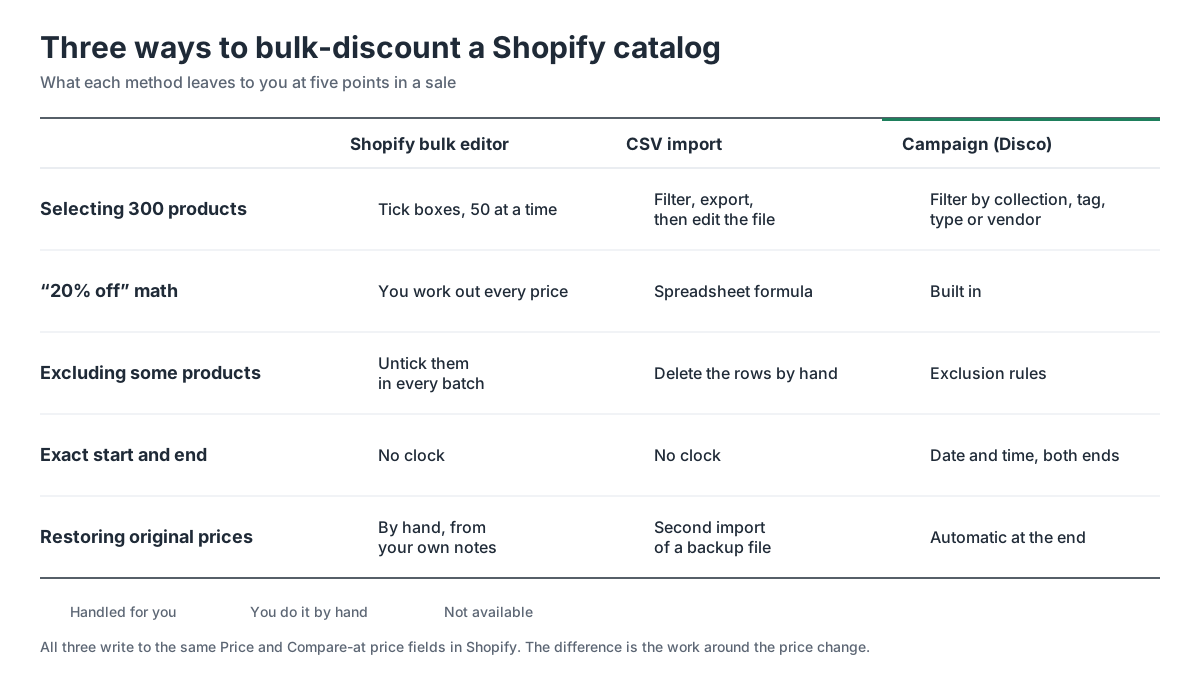
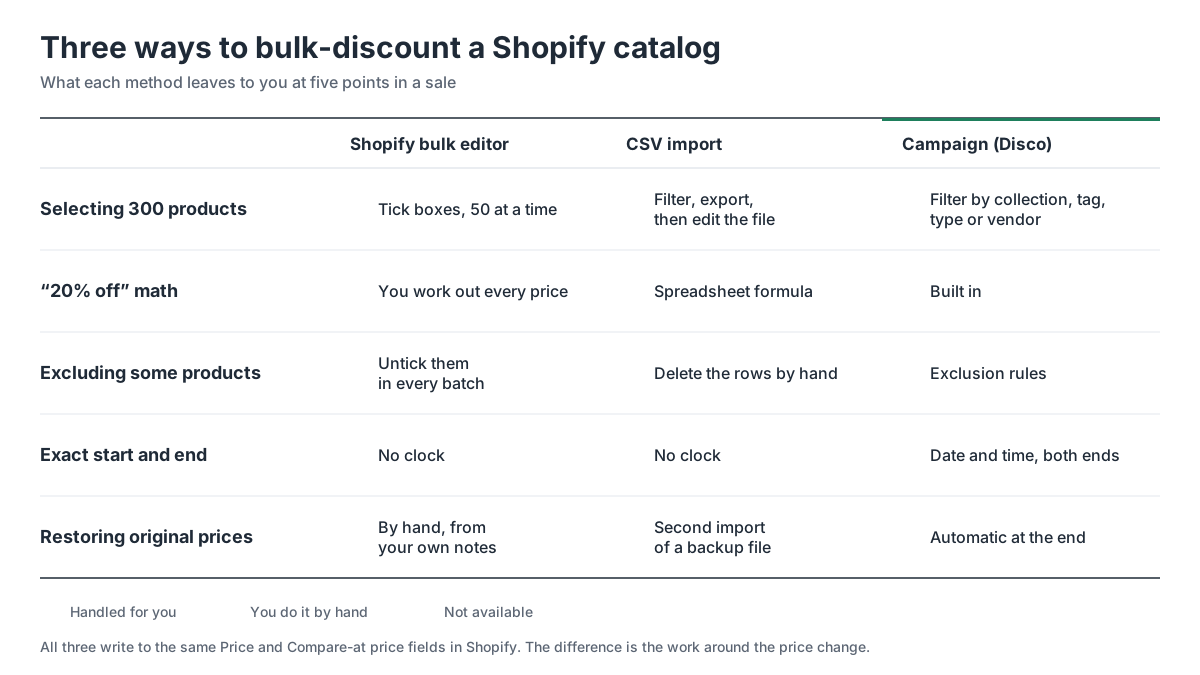
The three methods side by side
| Shopify bulk editor | CSV import | Campaign (Disco) | |
|---|---|---|---|
| Selecting 300 products | Filter and select in admin | Filtered export | Filters by collection, tag, type, vendor |
| "20% off" math | Manual | Spreadsheet formula | Built in |
| Excluding specific products | Untick them each batch | Delete rows | Exclusion rules |
| Scheduled start and end | No | No | Yes, date and time |
| Restoring original prices | Manual, from your own notes | Second import of backup file | Automatic at end |
| Badges, timer, sale collection | Separate work | Separate work | Part of the campaign |
| Blocking extra discount codes | Separate discount settings | Separate discount settings | Campaign option |
| Risk of touching the wrong products | Medium | High | Low, if you test first |
| Cost | Free | Free | Free plan; paid plans by catalog size |
How to apply bulk discounts in Shopify without CSV
Here's the workflow for a typical bulk sale, for example 25% off an entire "Autumn" collection, minus a handful of new arrivals, running Friday 08:00 to Sunday 23:59.
[Screenshot: Disco campaign setup, product selection step]
1. Select the products
Start a campaign and choose products by collection, tag, product type, or vendor. For your first sale, pick one collection so it's easy to review. Check the product list and count.
2. Apply a percentage or fixed-amount discount to multiple products
Choose a percentage or fixed amount off. Disco calculates the new prices and sets the compare-at values so supporting themes show the original price beside the offer.
3. Exclude products from your Shopify sale
Leave out new arrivals, low-margin products, and items already on sale. If your plan includes exclusion rules, add them here. Otherwise, build a selection that contains only the products you want to discount.
[Screenshot: exclusion rules with a tag-based exclusion]
4. Schedule the start and end
Enter both dates and times, and confirm the scheduler's timezone. For this example, the campaign runs from Friday 08:00 to Sunday 23:59. Match your promotional messages to that window.
5. Make the offer easy to find
Set up a countdown and a sale collection you can link to from email and your homepage. Depending on your plan, you can also add badges, an announcement bar, a dedicated sale page, and automatic product tagging for an automated collection.
6. Decide whether codes can apply
A 25% sale plus a 10% welcome code gives the customer 32.5% off. Block additional codes if you want to prevent that extra reduction. If stacking is part of your offer, include it in the margin calculation.
7. Test the full cycle
Run a short campaign on ten products. Check the product pages, collection cards, cart, and checkout, then let it end and verify the original prices return. Use the results to finish setting up the full sale.
[Short-form video embed: the whole flow from filter → discount → schedule → collection page → reset, 45 seconds]
What this looks like at different catalog sizes
Use these examples to estimate the work involved. Check current plans for product limits and the features your campaign needs.
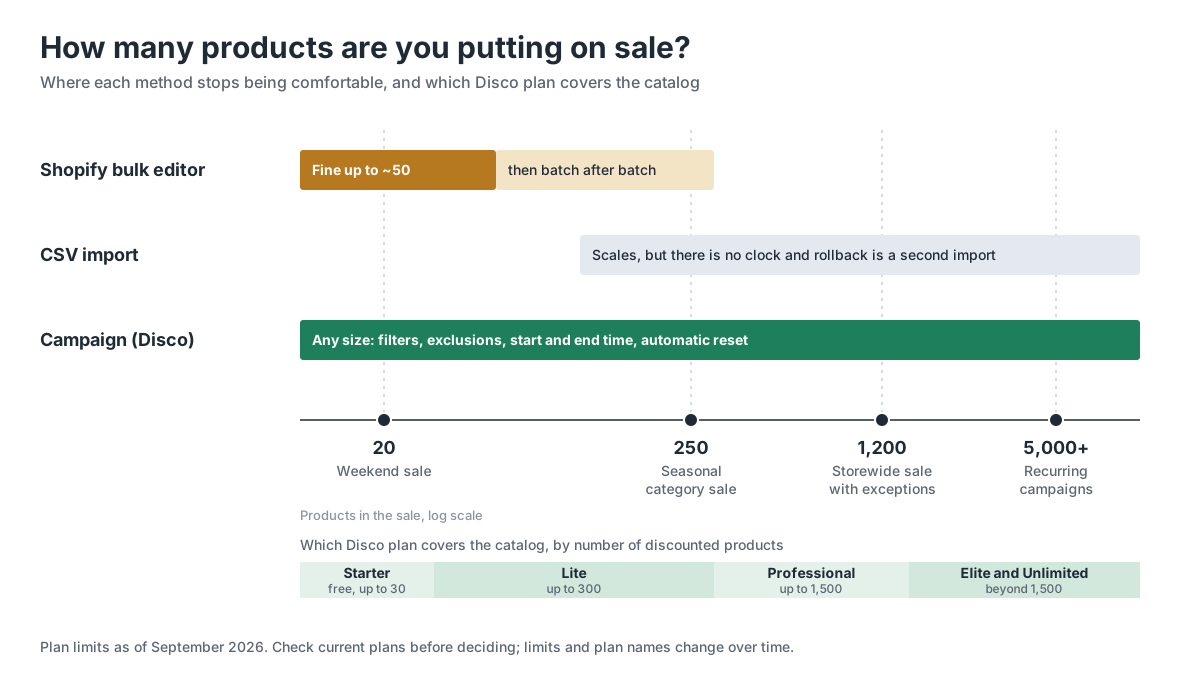
20 products, weekend sale
The bulk editor is a reasonable choice if you're happy to restore the prices yourself. If the Sunday-night reset is the part you want to avoid, try a scheduled campaign. Include the variants when estimating how much manual checking the sale will need.
How to discount an entire collection in Shopify
Example: a seasonal sale on a collection of 250 products.
At this size, checking and restoring individual prices takes longer. CSV can handle the calculations, but still needs an import at each end of the sale. A campaign lets you select the collection, exclude new arrivals, and schedule both changes. Choose a plan that covers the full selection and exclusions.
1,200 products, storewide sale with exceptions
Make the exceptions explicit: vendors, product types, tags, or individual products that must stay at full price. Review that selection carefully, whichever method you use. With a campaign, you can manage separate product groups and, on plans that support it, use a sale page or automatic tagging to gather the offers in one place.
5,000+ products, recurring campaigns
Assign one owner for pricing and list every integration that can change it. Test on a collection you can inspect fully before expanding the campaign. Check product and campaign limits, and include the timing of price-sync jobs in the plan.
Check these before changing hundreds of prices
Run this check before the sale, whichever method you choose.
- Test on ten products first. Every method, every time. Check the product page, the collection page, and the cart, then end the test and verify the reset.
- Check every variant, not just the parent product. Sizes and colors sometimes carry their own prices. Make sure the sale applied to all of them and that
Compare-at priceis higher thanPriceon each; Shopify won't show a strikethrough otherwise. - Decide on rounding. 20% off 249 is 199.20. Decide whether you're fine with that, or whether you want to round, before the campaign, not after customers see the prices.
- Review your discount codes. List every code that's currently live: welcome, influencer, loyalty, win-back, affiliate. Decide which ones should and shouldn't work on top of the sale price, and test at least one of them in checkout.
- Check Shopify Markets and fixed prices. If you set fixed prices per market or currency, confirm how the sale interacts with them for at least one non-default market.
- Check feed timing. Google Merchant Center, Meta catalogs, and marketplace listings need to catch up with both the sale prices and the reset. Check when each feed refreshes.
- Find everything that writes prices. ERP, inventory sync, PIM or product feed apps, marketplace connectors, supplier and print-on-demand apps, dynamic-pricing tools, currency apps, and other bulk editors. Shopify keeps the latest write to the price fields, so any of these can put your prices back mid-sale. Pause the sync, exclude the sale products, or move the sync job to before the campaign starts. Product Essentials has a dedicated help doc on price-sync conflicts with the exact steps.
- Check email prices. Review any prices entered by hand. If your email uses a product feed, confirm when it refreshes and send the launch message after the sale is live.
- Look at the theme. Confirm your collection cards show compare-at prices at all. If they don't, that's a theme setting, and it's the same for every method.
- Test the rollback. Not just "did the prices change" but "did they change back". End your test campaign and check that the original price is restored and the compare-at is cleared.
While a campaign is active, coordinate price changes with its owner. Direct product edits can conflict with the campaign and leave the wrong price after the reset.
Frequently asked questions
Does Disco replace Shopify's bulk editor?
Use the bulk editor or CSV for permanent price changes. Disco suits temporary sales that need a scheduled start, storefront promotion, and an automatic reset.
Can I run a percentage on one group and a fixed amount on another?
Yes. Each campaign has its own discount rule, and you can run multiple campaigns at the same time, so "25% off Autumn" and "$100 off all boots" can run side by side with different products, different timing, and different exclusions.
What about products that already have a compare-at price?
Test it before you decide. Put one already-discounted product into your ten-product test campaign and look at what the storefront shows. In most cases you'll want to exclude products that are already on sale so you don't discount a discount.
My prices changed back an hour after the sale started. Why?
Almost always another app or integration writing prices to Shopify. Note the time it happened, check which sync jobs ran around then, and work through the price-sync troubleshooting steps. Re-applying the discount alone won't fix it; the conflict comes back on the next sync.
Get the next bulk sale off your to-do list
Choose the method that fits the whole job: setting prices, checking the offer, and restoring the originals. For a timed campaign, create a free Disco campaign and test it on ten products. Once the launch and reset work as expected, use that setup for the larger sale.
Next: How to schedule a Shopify sale that starts and ends automatically covers the timing and the reset for the campaign you just built, and The 2026 BFCM playbook: plan your biggest sale months ahead is where a bulk sale becomes a season plan.