


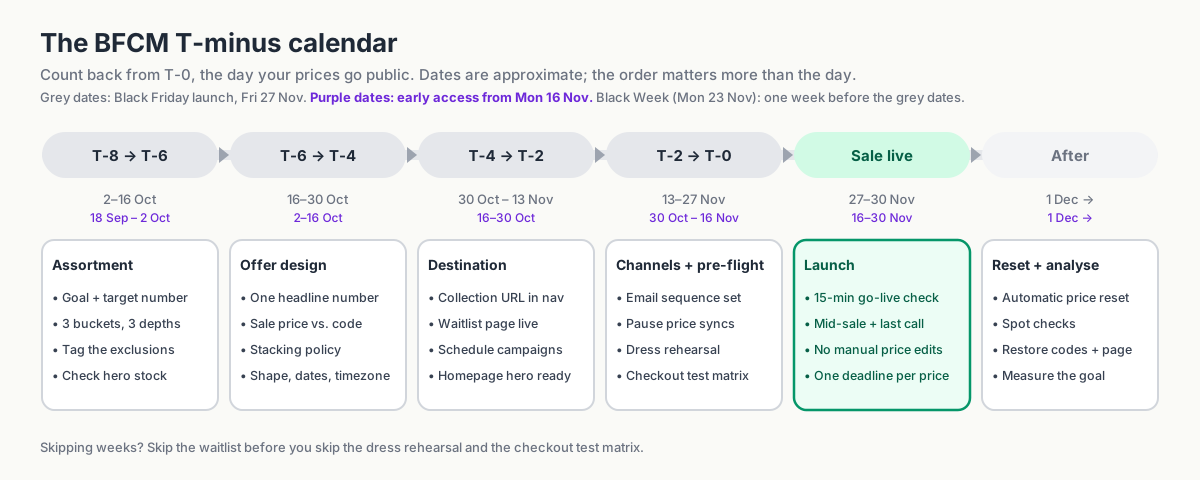
Black Friday 2026 is Friday 27 November; Cyber Monday is Monday 30 November. The end of the sale is the same for almost everyone. When it starts is your choice: Friday itself, a Black Week from Monday 23 November, or early access for your waitlist from mid-November.
This playbook counts back from T-0, the day your prices go public, using a 27 November launch as the example. Running Black Week? Shift every window a week earlier. Early access? Two weeks. By launch you'll have:
- one goal with a number attached, and three product groups tagged
- one headline offer, a codes policy, and every phase dated in one timezone
- one sale URL, scheduled campaigns, and emails timed after go-live
- a rehearsed reset, so the morning after takes care of itself
None of it needs code. The campaign brief and weekly checklist at the end turn the plan into assigned tasks.
In this guide
- Define the BFCM goal first
- 8–6 weeks out: choose the products
- 6–4 weeks out: design the offer
- 4–2 weeks out: build the sale destination
- The final two weeks: pre-flight
- Launch day: one clear deadline
- When BFCM ends
- BFCM planning template and weekly checklist
- FAQ
- Build the campaign before the traffic arrives
Define the BFCM goal first
Choose one primary goal before picking products or discount levels. It should guide both the offer and how you judge the results.
| Primary goal | What goes on sale | Typical depth | The one metric that matters |
|---|---|---|---|
| Revenue | Broad range, bestsellers included | Moderate, one memorable headline | Gross sales vs. target |
| Margin | Selective, high-margin lines and exclusions | Shallow, or bundled value rather than % | Contribution margin, not revenue |
| Inventory clearance | Aged stock, discontinued ranges, overstock | Deep, tiered by age | Units cleared and cash recovered |
| Acquisition | Entry products and gift-able items | Strong on a few hero products | New customers and their share of orders |
You can have a secondary goal, but decide which takes priority. A deep sitewide discount might increase revenue while leaving less margin and selling stock you didn't need to clear.
Write the goal and the target number at the top of your campaign brief. Everything below refers back to it.
8–6 weeks out: choose the products
For a 27 November launch: roughly 2–16 October. A week earlier for Black Week; two weeks earlier for early access.
One goal with a number, three product groups tagged, exclusions listed, hero stock checked.
Bestsellers vs. overstock
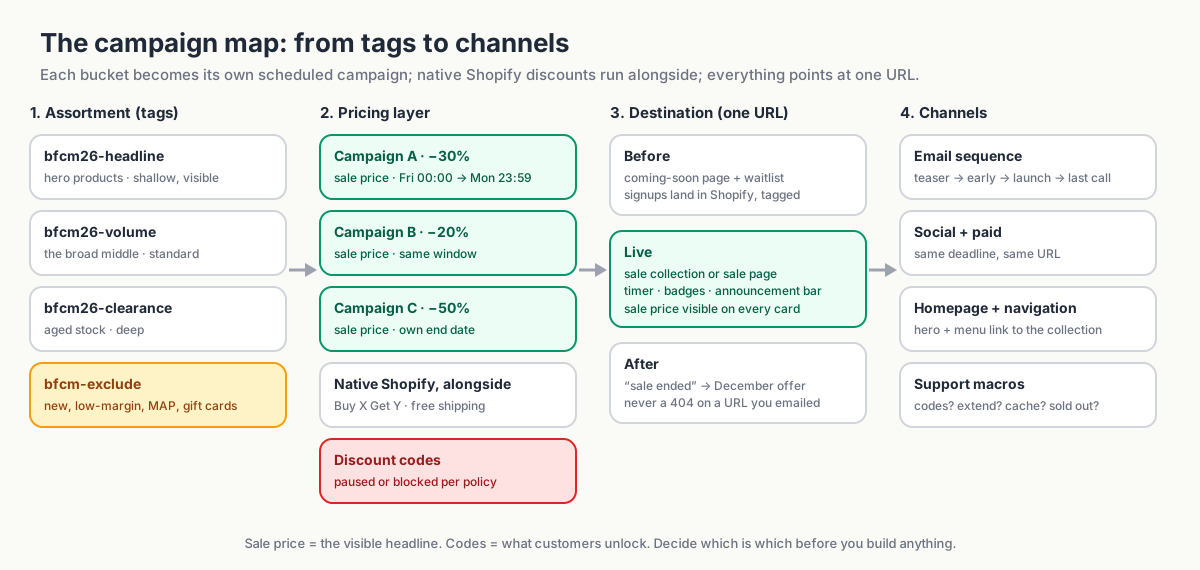
Bestsellers can attract shoppers, but some would sell at full price anyway. Older stock may need a deeper offer to move. Split the sale into three groups:
- Headline products. A small group of hero items with a strong, visible offer. Their job is to earn the click from the email or the ad.
- Volume products. The broad middle of the catalog at your standard BFCM depth. Their job is to turn the visit into a bigger basket.
- Clearance products. Aged or discontinued stock at a deeper discount. Their job is to leave the warehouse.
Give each group a discount level that matches its role and margin. For each headline product, compare stock on hand with expected demand and decide what happens if it sells out: feature a replacement, offer a waitlist, or direct shoppers to the rest of the collection.
Decide the exclusions now
The products you don't discount matter as much as the ones you do. Typical exclusions:
- new arrivals and current-season launches,
- low-margin lines where 20% off means selling at a loss,
- products with a minimum advertised price from the brand,
- gift cards, pre-orders, and services,
- items that are already reduced (so you don't discount them twice),
- hero SKUs you'd rather protect than devalue.
Record the exclusions now so they are part of the setup from the start.
Organize the products with tags or collections
Tag the groups (bfcm26-headline, bfcm26-volume, bfcm26-clearance, bfcm-exclude) or organize them into collections. Product type and vendor can also work as filters.
These groups make the selection easier to review and reuse, whether you apply prices with the bulk editor, a CSV, or an app. Disco selects campaign products by collection, tag, type, or vendor and lets you add exclusions on top, so a tag-based assortment maps directly onto three campaigns with three discount levels. But the tagging discipline is worth doing whichever tool applies the prices.
6–4 weeks out: design the offer
For a 27 November launch: roughly 16–30 October.
Sale shape chosen, one headline number, a mechanism for each offer, every phase dated in one timezone, codes policy written.
Choose the shape of your sale
Cyber Monday is the deadline whichever shape you choose. What changes is when the price drops, and for whom.
| Shape | Prices go public | Trade-off |
|---|---|---|
| Weekend only | Fri 27 → Mon 30 Nov | Maximum urgency, but four days to make the number and everything happens at once on launch night |
| Black Week | Mon 23 → Mon 30 Nov | Matches markets where competitors run all week; urgency fades mid-week and margin is exposed for eight days |
| Early access, then deeper | Waitlist from ~16 Nov at a lighter discount; everyone from 27 Nov | Grows the list and keeps Friday an event; two prices to communicate, and the early one must be visibly lighter |
| Black November | From 11 Nov (Singles' Day), with BFCM as the finale | Suits large catalogs; a month-long sale is a price, not an event, and reference-price rules bite hardest |
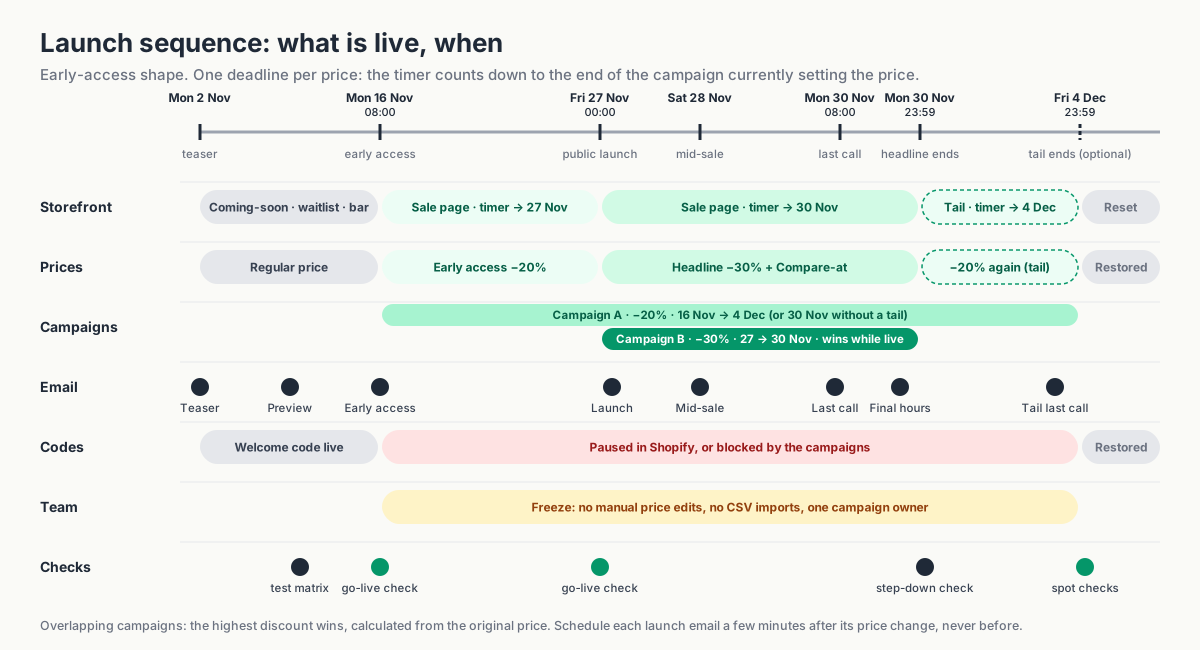
The first two shapes are the campaigns you build anyway, one per product group, sharing a start and an end. The last two add a second, lighter layer on the same products. In Disco a product can sit in several campaigns at once and the highest discount wins, calculated from the original price: a 20% campaign from 16 November plus a 30% campaign from 27 November gives a $1,000 product an $800 price for the waitlist and $700 from Friday, with nothing to switch over on the night. The timer always counts down to the end of the campaign currently setting the price.
The same mechanism gives you a Cyber Week tail without moving a deadline: let the lighter campaign run to 4 December while the headline campaign ends on Monday night, and prices step from 30% to 20% to regular.
Pick the headline and how each offer applies
Choose a headline that matches what shoppers will find. "30% off selected styles, 50% off last season" sets a clearer expectation than "up to 50% off" above mostly 10% reductions. Make the exclusions easy to find.
Then decide the mechanism. A sale price (Price lowered, Compare-at price set to the original) is visible on every product page and collection card from the first click. A discount (a code or an automatic discount) leaves the product price alone and shows up at checkout. Use the sale price for the headline and for each product group's depth, one campaign per group; use discounts for the extras. How to show sale prices on Shopify product pages before checkout has the detail.
Disco handles the catalog-price layer: bulk sale pricing with compare-at display, scheduled start and end, and the storefront elements around it. Build a Buy X Get Y, gift-with-purchase, or free-shipping offer natively in Shopify's Discounts section and run it alongside the campaign; those are cart rules, not price changes. Bundles and upsells are a different tool for a different job.
Fix the dates and phases
Give each phase a date, time, and timezone. Confirm which timezone the scheduler uses. Here's an example for 2026 using the early-access shape; for a weekend-only sale, drop the early-access row and move the teaser to 13 November:
| Phase | When | What's live |
|---|---|---|
| Teaser | Mon 2 Nov | Coming-soon page, waitlist, announcement bar |
| Early access | Mon 16 Nov, 08:00 | Lighter sale price live (or early-access code); waitlist email; timer counting to 27 Nov |
| Public launch | Fri 27 Nov, 00:00 | Headline sale price takes over, sale page, badges, launch email; timer now counting to 30 Nov |
| Cyber Monday push | Mon 30 Nov, 08:00 | Last-call messaging |
| End | Mon 30 Nov, 23:59 | Prices reset (or step down to the Cyber Week campaign), sale page down, timers off |
Decide now whether you'll run a Cyber Week tail. Schedule it from the start as its own, lighter campaign with its own end, so the BFCM deadline you've advertised stays true.
Reference prices. In the EU and several other markets, the "before" price you show must reflect the lowest price you charged in a recent window (commonly 30 days). Two consequences: keep the weeks before your first campaign free of separate sales on the same products, and make sure your Compare-at price is a price you can evidence. A Black Week or early-access phase that runs into Black Friday as one continuous, progressively deeper sale generally keeps the pre-campaign price as the reference, which is also how Disco calculates overlapping campaigns. Check the rules for the markets you sell in; this is not legal advice.
Decide which codes can stay active
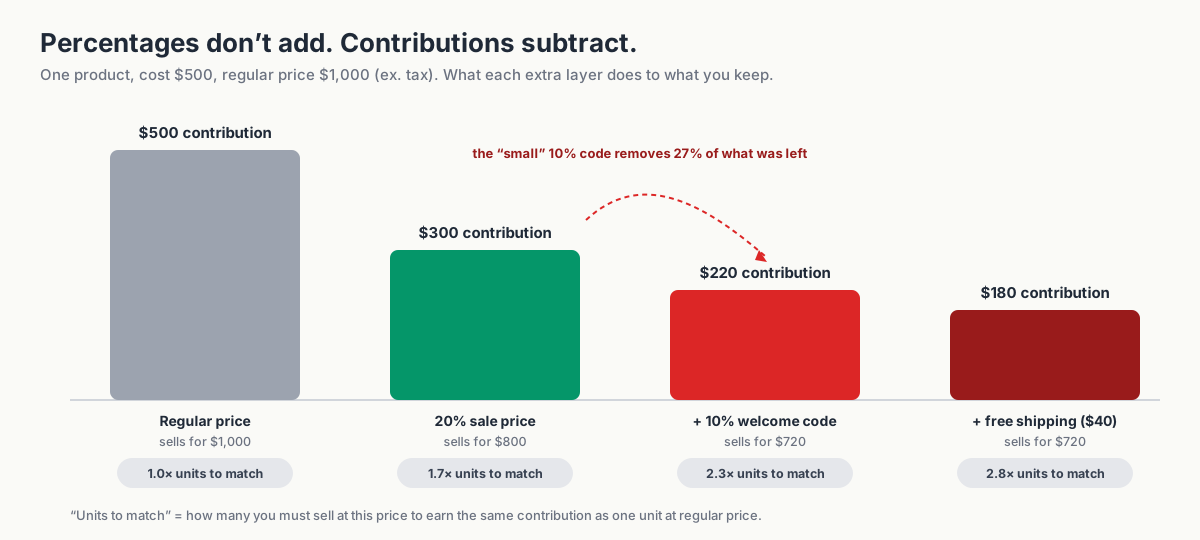
Welcome, abandoned-cart, loyalty, influencer, and affiliate codes all apply to the reduced price unless you stop them. A 20% sale plus a 10% code is a 28% discount, and during BFCM every one of those codes finds its way to checkout.
Run the numbers before you decide. These examples exclude tax and other costs such as payment fees:
| Scenario | Selling price | Cost | Contribution | Contribution % | Units needed to match regular contribution |
|---|---|---|---|---|---|
| Regular price | $1,000 | $500 | $500 | 50% | 1.0× |
| 20% sale price | $800 | $500 | $300 | 37.5% | 1.7× |
| 20% sale + 10% welcome code | $720 | $500 | $220 | 30.6% | 2.3× |
| … + free shipping ($40 cost) | $720 | $540 | $180 | 25% | 2.8× |
The extra code cuts what's left per unit from $300 to $220, so you need about 2.3 times the volume to earn what one unit earned at regular price. Repeat the calculation for your headline products.
Then pick a policy; most campaigns use more than one:
- Pause codes that shouldn't apply. End the welcome code the day before your first campaign and restart it afterwards; change the popup copy so you aren't promising 10% you won't honour.
- Use Shopify's combination settings for how discounts combine with each other. They don't cover a sale price, which isn't a discount object, so on their own they won't stop a code applying to a reduced price.
- Block codes during the campaign. Disco can block additional discount codes while a campaign is active; test any automatic discounts separately.
- Allow a planned extra discount, say 5% for loyalty members, and put that reduction in the worksheet and the brief.
Write the decision in the brief so marketing, support, and the campaign owner give customers the same answer. Stop discount stacking and protect margin covers the combination rules and the audit in detail.
4–2 weeks out: build the sale destination
For a 27 November launch: roughly 30 October – 13 November.
The sale URL exists and sits in the menu, the waitlist is live, every campaign is scheduled with a start and an end.
Give the sale one destination URL
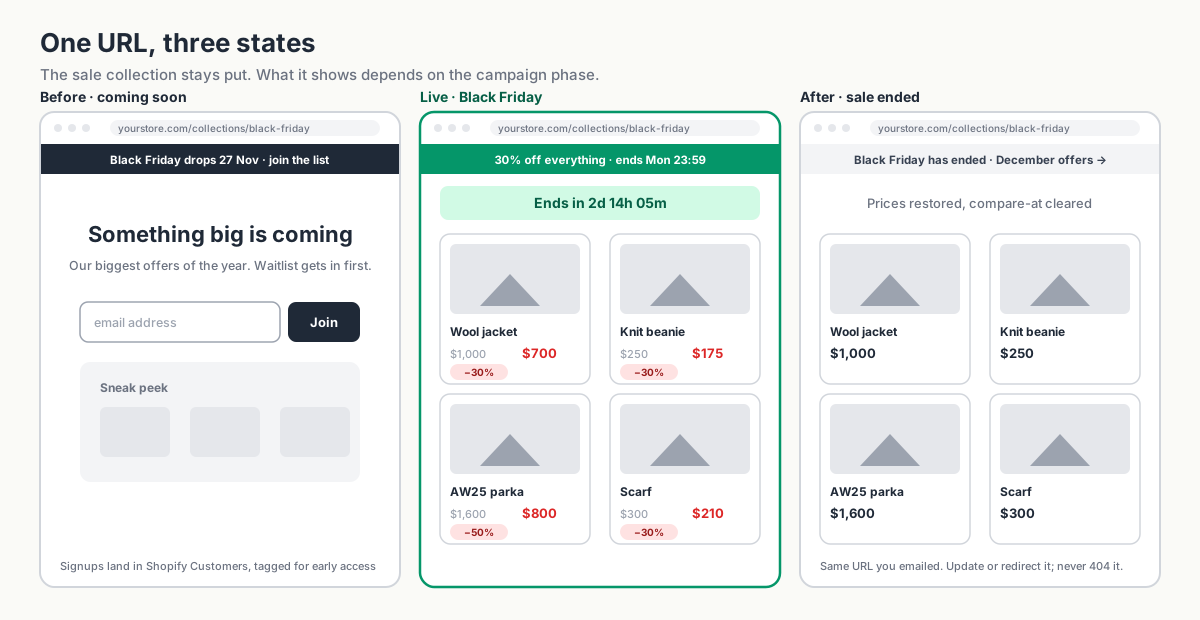
Point your emails, ads, social posts, and homepage banner to one sale URL. A collection can work well because you can keep it available after the campaign and reuse it next year.
You can build the collection manually or as an automated collection driven by a tag. Disco can generate the sale collection from a campaign's products, and on higher plans auto-tag them so an automated "On sale" collection fills when the campaign starts and empties when it ends. Either way, the collection should exist and be linked in navigation before launch, even if it shows "coming soon" until the prices change.
A coming-soon page and a waitlist
A coming-soon page gives interested shoppers somewhere to sign up before launch. Keep the teaser short and explain what joining the waitlist gets them.
Disco supports this lifecycle directly: a coming-soon page before the campaign, a scheduled announcement bar that collects email addresses, and a flash-sale page that publishes when the campaign starts and comes down when it ends. Addresses land in your Shopify customer list with tags, so the early-access segment is ready without exporting anything.
You can also use a Shopify page, your existing newsletter form, and a customer tag or segment. Have the signup flow ready before you start promoting the waitlist.
Homepage and navigation
- Add a "Black Friday" link to the main menu pointing at the collection or coming-soon page.
- Prepare the homepage hero, but don't rely on publishing theme changes by hand at midnight. Point the hero at the sale collection URL; let the announcement bar and sale page carry the "it's live" state, since those can be scheduled.
- Check that your search results and any "recommended products" blocks won't surface excluded products with sale styling by accident.
The final two weeks: pre-flight
For a 27 November launch: roughly 13–27 November.
Emails scheduled after go-live, price syncs paused, dress rehearsal and checkout matrix passed, freeze rules communicated.
Schedule the emails and social
Plan messages for each phase. Adapt this sequence to your audience and usual sending frequency; you don't need every send.
| Send | Timing | Purpose |
|---|---|---|
| Teaser | T-14 days | "Something's coming." Drive waitlist signups. |
| Preview | T-7 days | Show 3–5 hero products; restate the waitlist benefit. |
| Early access | When the early price goes live (T-1 evening for a weekend sale; around T-11 for early access from 16 Nov) | Waitlist only. First look, early-access code if you're using one. |
| Launch | T-0, shortly after go-live | Everyone. Headline offer, deadline, link to the collection. |
| Mid-sale | T+1 or T+2; one mid-week send for a Black Week | Bestsellers from the first 24 hours, restocks, social proof. |
| Cyber Monday | Monday morning | Last call, with the real end time. |
| Final hours | Monday, ~6 hours before end | Short. Deadline only. |
A longer sale doesn't earn more emails. For a Black Week, add one mid-week send and keep the rest of the sequence; for early access, the price change on Friday is a second launch and deserves its own send. The last-call emails do more work than the launch email.
Three things to settle before you schedule:
- One deadline, everywhere. Timer, announcement bar, email footer, and Instagram story must show the same end time, or you've created a support ticket.
- When email prices update. Some tools pull prices at send time, others cache them. Schedule the launch email after the price change and check a test send once the sale is live.
- Support replies. Do codes work, when does it end, what if a price looks wrong, what if it sells out. Share them with whoever handles social comments.
Find every system that writes prices
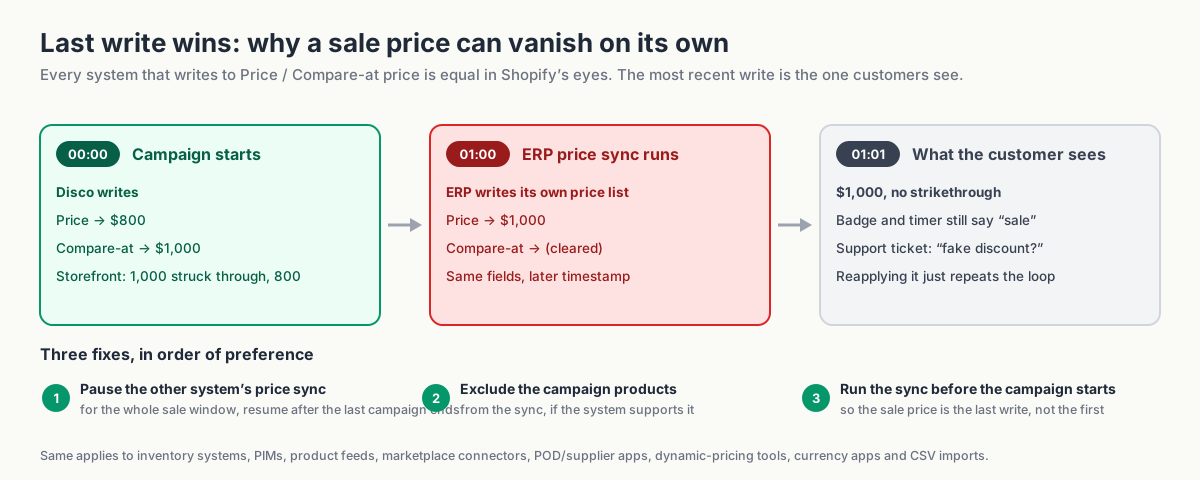
Other integrations write to the same price fields as your campaign: ERP or inventory systems, supplier apps, marketplace connectors, pricing tools, scheduled imports. If one syncs the regular price after the sale starts, it overwrites the offer, and reapplying the discount won't fix a conflict that repeats on every sync.
Fill this table in for your store:
| System | Writes prices? | How often | Owner | Action for BFCM | Tested? |
|---|---|---|---|---|---|
| e.g. ERP price sync | Yes | Hourly | Ops | Pause price sync from T-1 to the day after the last campaign ends | ☐ |
| e.g. Google Shopping feed | Reads only | Daily | Marketing | Confirm refresh timing after go-live | ☐ |
| e.g. Marketplace connector | Yes | On change | Ops | Exclude BFCM products from sync | ☐ |
Three fixes, in order of preference: pause the other system's price sync for the sale window; exclude the campaign products from it; or run its sync before the campaign starts so the sale price is the last write. Our help article on why Disco discounts appear, then disappear later covers the fix, and When a Shopify discount disappears: troubleshooting price sync walks through finding the culprit.
Three smaller checks while you're at it:
- Shopify Markets. Market-specific pricing may not follow a base-price change identically; check one product per market in the rehearsal and at go-live.
- Product feeds and ads. A feed that refreshed at 22:00 on Thursday advertises full price until it runs again, and ad/landing-page mismatches get products disapproved. Trigger a refresh after go-live.
- Theme and cache. Confirm compare-at prices and badges show on collection cards and product pages; after launch, check in a private window before blaming the cache.
Rehearse the launch and the reset
A week before, run a real campaign on three to five test products for thirty minutes. Watch the start (prices, badges, timer, bar, sale page), then watch the end (prices restored to the exact original values, compare-at cleared, page unpublished). This is when you discover a missed variant, a wrong timezone, or a plan product limit lower than your assortment. If you use overlapping campaigns, rehearse the overlap too: start the lighter campaign, let the deeper one take over, and watch the price step back down when the deeper one ends.
Then run the checkout matrix on the live store with real cart values, and record expected and actual totals:
| # | Scenario | Expected result |
|---|---|---|
| 1 | Headline product, no code | Sale price only |
| 2 | Headline product + welcome code | Per policy: blocked, or stacked at known cost |
| 3 | Excluded product + welcome code | Full price, code applies (or not) per policy |
| 4 | Clearance product + abandoned-cart code | Per policy |
| 5 | Cart over free-shipping threshold | Shipping discount applies; check it combines as intended |
| 6 | Buy X Get Y offer + sale product | Native discount behaves as configured |
| 7 | Product in a second market/currency | Sale price and strikethrough render correctly |
| 8 | Mobile checkout, any of the above | Same totals as desktop |
Freeze rules for the sale window
- No manual price edits on campaign products while a campaign is scheduled or live. If a price must change, change it through the campaign or after the reset.
- No CSV imports touching price columns during the sale window.
- Don't uninstall or reinstall pricing apps mid-campaign.
- One person owns the campaign; everyone else asks before touching prices.
Launch day: one clear deadline
One deadline everywhere, and a 15-minute check before the launch email goes out.
A useful countdown answers a practical question: how long do I have to buy? Set it to the campaign's real end time, and use stock messages only when they reflect actual inventory.
What real urgency looks like in a Shopify storefront:
- Countdown timer on the product page (and the sale collection, if your theme supports it), counting to the actual campaign end. Disco's timer is tied to the campaign schedule, so it can't disagree with the end time; with overlapping campaigns it counts to the end of the one currently setting the price.
- Sale badges on product cards showing the real saving ("Save 30%" or "Save $200"), driven by the compare-at price rather than typed by hand.
- Announcement bar with the headline and the deadline, linking to the collection.
- Inventory-driven scarcity only when it's true. If a hero product is down to its last units, say so; if it isn't, don't.
Keep the deadline prominent and easy to read. One well-placed timer is enough.
Go-live check (the first 15 minutes)
- Open a headline product in an incognito window: sale price, strikethrough, badge.
- Open the sale collection: every card shows sale styling; excluded products are absent.
- Timer shows the correct remaining time; announcement bar links to the right URL.
- Coming-soon page has been replaced by the sale page (or redirects).
- Place a test order with no code, then one with your welcome code, and confirm the totals match your codes policy.
- Send the launch email to yourself and check that prices render as sale prices.
- Check one product in each market you sell to, if you use Shopify Markets.
When BFCM ends
Reset verified, codes restored, sale URL still alive, results measured against the goal.
How to restore regular prices after your Black Friday sale
At the end time, the campaign restores prices and removes the sale elements you enabled. Check the price display, page, timer, badges, announcement bar, and any collection using campaign tags during your rehearsal so you know what to expect after Cyber Monday.
If a lighter campaign is still running when the headline campaign ends (the Cyber Week tail), the price steps down to that campaign's sale price, not to the regular price. That is the design, not a failed reset; the original price returns when the last campaign ends. Tell whoever runs the spot checks which state to expect on which morning.
Spot checks (the morning after a campaign ends)
- Ten products across the three groups: price restored, or stepped down to the tail campaign's price if you scheduled one; headline sale styling removed.
- Every variant on two multi-variant products.
- One product per market.
- Search results and recommended-product blocks show no stale sale styling.
- Product feed has picked up the restored prices.
- Welcome code is active again and the popup copy is back to normal.
- The BFCM URL still resolves. It's in every email you sent, so don't let it 404: keep the collection live with a "sale ended, here's what's next" message, or redirect it to your December offer, and update the navigation link.
Measure the result against your goal
Start with the one metric you chose at the top: revenue against target, contribution after product and shipping costs, units cleared, or new customers and their share of orders. Then the diagnostics: units sold per product group, average order value, discount-code usage during the sale (your stacking leak, in $), support tickets by type, stockouts and when they happened, and anything that went wrong with prices, timers, or syncs.
Then write down three things to change. Keep the tags, the brief, and the test matrix. Next year starts from here, not from a blank page.
BFCM planning template and weekly checklist
Copy both of these into your planning doc. The brief is one row per decision made above; the checklist is the same plan as dated tasks.
Campaign brief
| Field | Your answer |
|---|---|
| Primary goal and target number | |
| Secondary goal | |
| Sale shape (weekend / Black Week / early access + deeper / Cyber Week tail) and T-0 date | |
| Phases, dates, times, timezone | |
| Headline offer (the one number) | |
| Group 1: tag / collection → discount | |
| Group 2: tag / collection → discount | |
| Group 3: tag / collection → discount | |
| Exclusions (tag or list) | |
| Native Shopify discounts running alongside (BXGY, shipping) | |
| Codes policy (which codes apply, which are blocked/paused) | |
| Destination URL | |
| Email schedule and owner | |
| Social and paid schedule and owner | |
| Systems that write prices, and the action for each | |
| Rollback plan and who verifies it | |
| Test campaign date | |
| Campaign owner (single name) |
Your weekly checklist
T-8 to T-6 weeks
- ☐ Primary goal and target number agreed and written down
- ☐ Products sorted into headline / volume / clearance groups
- ☐ Exclusions decided and tagged
- ☐ Groups organized with tags or collections in Shopify
- ☐ Inventory depth checked for headline products; sell-out plan agreed
T-6 to T-4 weeks
- ☐ Sale shape chosen and T-0 date set; planning calendar shifted to match
- ☐ Headline number chosen
- ☐ Mechanism decided for each offer element (sale price vs. native discount)
- ☐ Dates, times, timezone fixed; Cyber Week tail scheduled or ruled out
- ☐ Reference-price rules checked for your markets
- ☐ Codes policy written
T-4 to T-2 weeks
- ☐ Sale collection created and linked in navigation
- ☐ Coming-soon page and waitlist live
- ☐ Announcement bar scheduled
- ☐ Homepage hero prepared
- ☐ Campaigns built and scheduled (one per group, plus the overlapping early-access or tail campaign if you use one) with start and end times
T-2 weeks to launch
- ☐ Email sequence written and scheduled (launch email timed after go-live)
- ☐ Social and paid assets ready, all pointing to one URL
- ☐ Support macros written
- ☐ Price-writing systems table completed; syncs paused, excluded, or re-timed
- ☐ Feed refresh timing confirmed
- ☐ Dress-rehearsal campaign run and reset verified (including the overlap, if you use one)
- ☐ Checkout test matrix completed on the live store
- ☐ Freeze rules communicated to the team
Launch and during
- ☐ 15-minute go-live check completed
- ☐ Mid-sale email sent; restocks and sell-outs handled
- ☐ Last-call sends timed to the real end
After
- ☐ Reset verified with spot checks
- ☐ Codes and popup restored
- ☐ Landing-page state updated
- ☐ Analysis completed against the primary goal
- ☐ Three changes for next year written down
FAQ
When should I start planning Black Friday on Shopify?
Eight weeks out is comfortable; six is workable; four means skipping the waitlist phase and accepting some risk on the technical side. Whatever you skip, don't skip the dress rehearsal and the checkout test matrix.
Should I use a sale price or a discount code for the headline offer?
Sale price. The headline has to be visible on product and collection pages, and only a change to Price and Compare-at price does that. Use codes for what codes are good at: early access, loyalty, influencers, and anything you want the customer to unlock rather than see.
Can I run different discounts on different products at the same time?
Yes. Give each product group its own campaign, selection, discount, and schedule. Disco supports campaigns running at the same time, and the same product can sit in more than one; the highest discount applies. With the bulk editor or CSV, you'd apply and restore each group's prices separately.
What if I want to extend the sale?
Decide before launch. If you want a Cyber Week tail, schedule it as a separate, lighter campaign from the start; in Disco it can overlap the headline campaign and simply outlast it, so prices step down rather than snapping back. Moving a deadline you've already counted down damages the credibility of every future timer.
Do I need an app for Black Friday?
If you have a small catalog, one discount level, and someone happy to change prices at midnight and again on Tuesday, Shopify's bulk editor and a CSV backup will do. An app earns its place when there are more products than you want to edit and reverse by hand, more than one discount level, a hard start and end time, storefront elements like timers and badges, or a codes policy you need enforced rather than hoped for.
Build the campaign before the traffic arrives
Give yourself a launch day spent checking a finished campaign. Tag the products, agree the offer and the shape of the sale, schedule the start and end, and test the reset while there's still time to change things. Start with the brief above and assign an owner to each task.
Install Disco, create the sale collection, and schedule the start and end well in advance. The free plan is enough to build and test a small campaign today; for larger plans, see our current plans page.
Install Disco from the Shopify App Store →
Next: How to schedule a Shopify sale that starts and ends automatically walks through the scheduling and reset this playbook relies on, and Bulk discounts in Shopify: put hundreds of products on sale without CSV covers applying the three discount levels to a large catalog.